Integrating AI Grading: A Step-by-Step Guide for Schools, colleges, coaching institutes & teachers
Updated: · Rollout checklist included
Before You Start: What You Need
You don’t need expensive hardware. Most schools can start with existing smartphone scanners, or a basic document scanner for office staff. The key is to standardize the scanning process so OCR/HTR stays accurate.
Minimum requirements checklist
- Scanning method: phone scanning app or a document scanner
- PDF format: one student per PDF (recommended)
- Rubric input: question paper + model answer (best) or teacher-defined rubric
- Roles: one examiner/admin to create exams + teachers to review outputs
How It Works (Scan → Rubric → Marking → Marked PDF → Excel Summary)
Step 1: Digitization (Scan answer sheets correctly)
The most important step is scanning. If pages are dark, cropped, or skewed, AI can still work, but accuracy will drop. Create a consistent scanning routine for students or staff.
Scanning tips (school-ready)
- Good lighting: avoid shadows and glare
- Flat pages: keep pages flat; avoid heavy curves near binding
- Full page in frame: don’t cut margins/corners
- Order: scan sequentially to reduce mapping issues
- File naming: class_testname_studentname (helps operations)
Step 2: Upload to the secure AI dashboard
Teachers (or a coordinator) upload the question paper and model answer once, then upload student answer sheets in bulk. A secure dashboard ensures only authorized teachers access evaluation outputs.
Step 3: Rubric setup (the “fairness engine”)
Rubric quality is the biggest factor in consistent scoring. A strong rubric includes:
- Per-question marks (including sub-questions)
- Expected points / key concepts
- Rules for partial credit
- Strictness level (lenient/moderate/strict)
Once approved, the same rubric is applied to every student—this is how consistency is achieved.
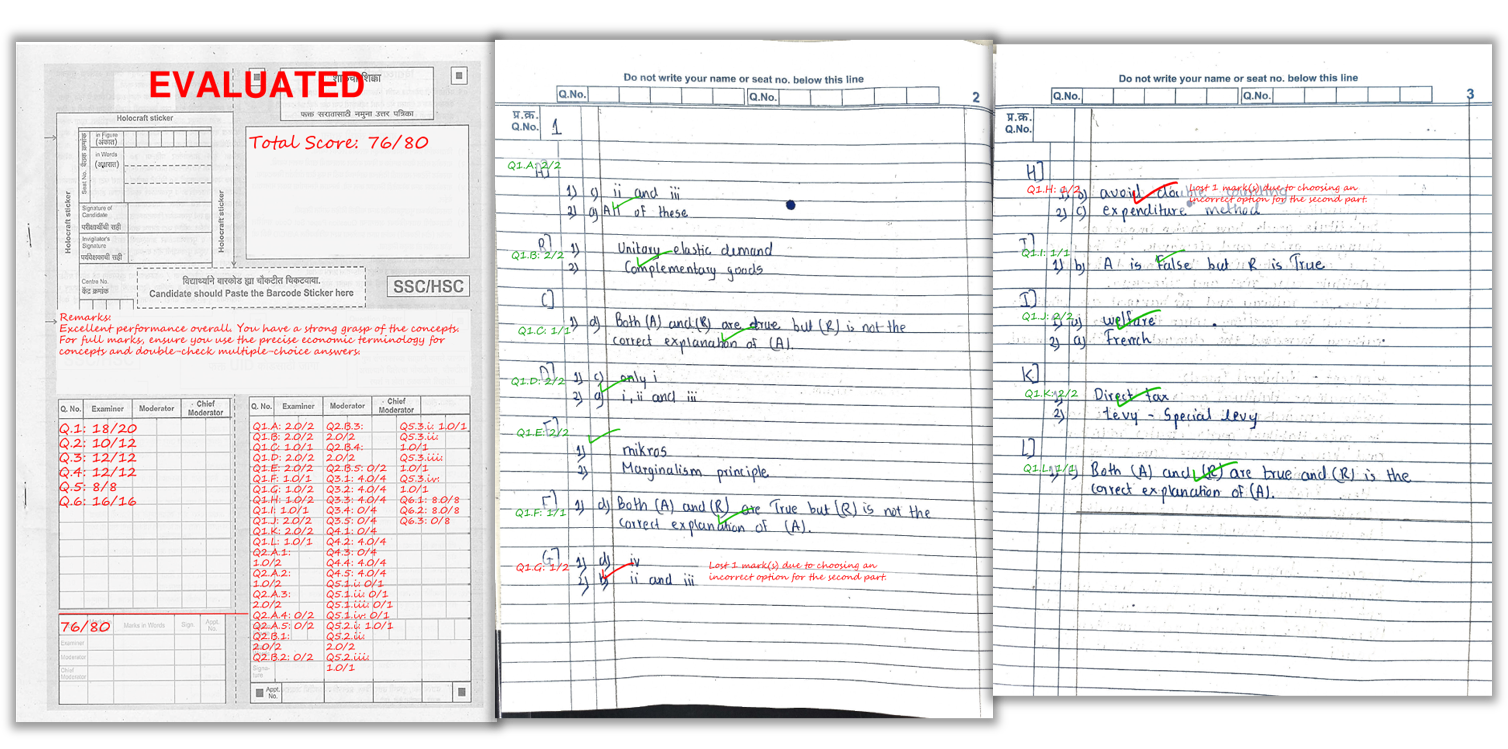
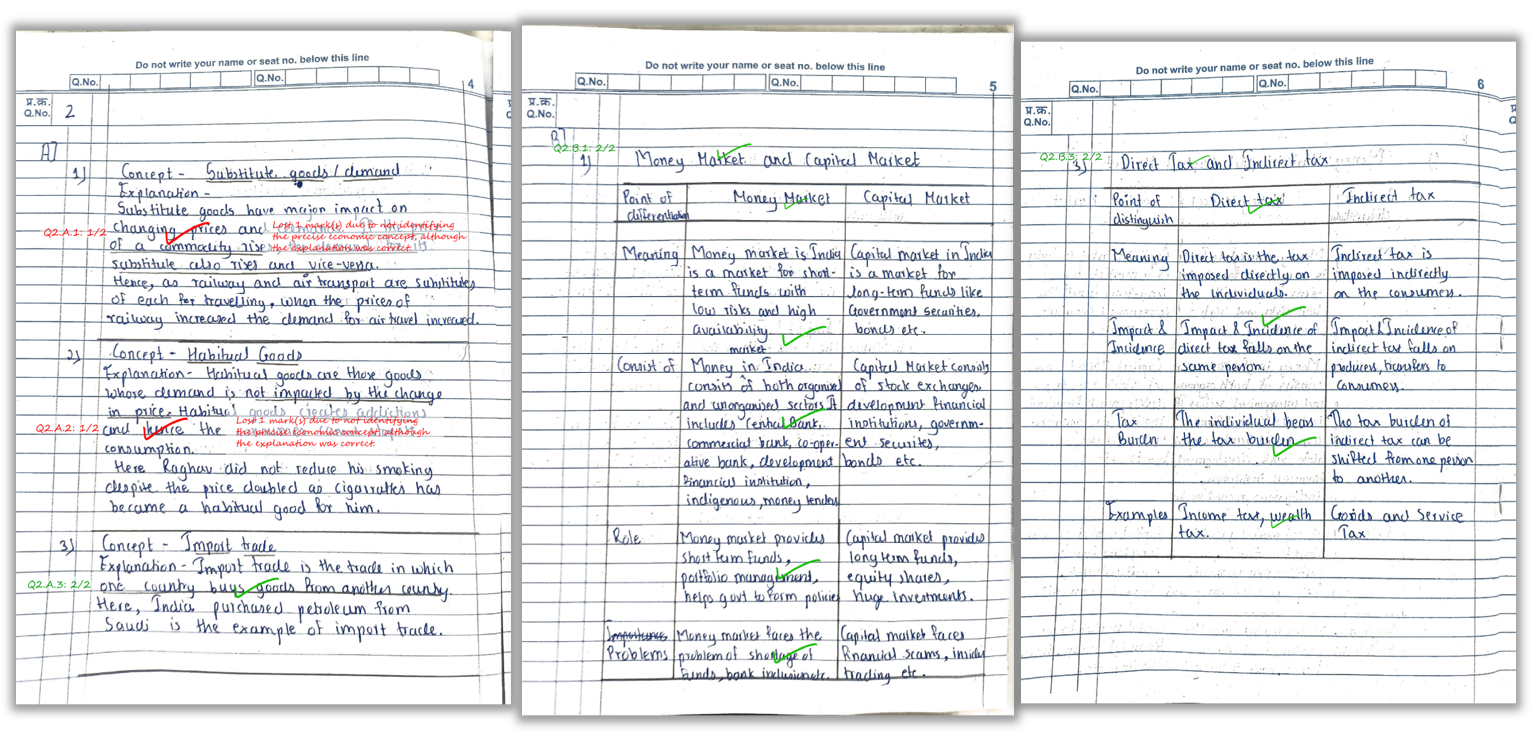
Step 4: Evaluation (marks + short teacher-style remarks)
The AI evaluates each answer against the rubric, assigns marks, and generates concise comments where marks are deducted. Typical remark styles include “missing definition”, “no example”, “diagram not labeled”, etc.
Step 5: Review and publish results
Your staff reviews outputs and shares results with students. Outputs usually include:
- Marked PDFs (question-wise marks + remarks on the sheet)
- Excel summary (total score + feedback per student)
- Optional batch analytics (weak questions/topics)
Rollout Plan (Pilot → Scale)
The fastest way to integrate AI grading is to start small and then expand once teachers are comfortable.
Phase 1: Pilot (1 subject, 1 grade, 1 test)
- Pick one teacher champion
- Use a simple paper pattern
- Run AI grading + manual check comparison for 20–30 papers
- Refine scanning SOP and rubric clarity
Phase 2: Expand (multiple sections, same paper pattern)
- Standardize rubric formats across teachers
- Train staff on scanning and upload workflow
- Introduce analytics to identify weak topics
Phase 3: Scale (school-wide adoption)
- Create exam templates for repeat use
- Define storage + deletion policy
- Move to bulk credits / institute plan when needed
See how marks and remarks appear directly on the student’s answer sheet.
FAQ
1) Do we need a scanner for AI grading?
Not necessarily. Most schools can start with phone scanning apps. A document scanner is helpful for very high volume.
2) How do we keep marks consistent across teachers?
Use a standardized rubric format and approve the rubric before evaluation. The same rubric applied to all papers creates consistency.
3) Can AI award partial marks?
Yes. With a rubric that defines key points and scoring rules, AI can award partial credit for partially correct answers.
4) What do teachers get after evaluation?
Marked PDFs with remarks and question-wise scores, plus an Excel summary with totals and overall feedback per student.
5) How long does evaluation take?
Depends on batch size and pages. Small batches are quick; large batches may take longer depending on queue and processing time.
Related Reading
Ready to roll this out in your school?
Explore Key Features, see Pricing, or Sign Up and start with free credits.